The app description is the biggest piece of text on your app’s product page. With up to 4,000 characters, you have a lot of space to give users information about your app.
Making it an interesting and engaging read is not easy. People’s attention spans get shorter and shorter these days, and only a few of them will bother to read your description in full.
But there are ways to improve your app’s long description, make users read it completely, and increase the chance they will download your app afterward.
To write a great app description for Google Play, follow these 9 steps:
- Research Keywords
- Create the App Description’s Structure
- Write the First Paragraph
- Write the Feature Section
- Add Social Proof
- Add Technical Requirements
- Add Contact, Social Media, Portfolio
- Beautify Your App Description
- Proofread Your App Description
Step 1: Research Keywords
The app description in Google Play is indexed by the store’s search algorithm. This means that if a user searches for a keyword and your description contains this word, your app can show up in search results.
To make sure you increase your app’s visibility in SERPs, you must implement your most important keywords into the long description. Doing so will also help you increase your conversion rates (the number of users who download the app after visiting your product page). The reason is that people who search for a keyword and see it in your app description afterward will feel ensured that your app can solve their problem.
For these reasons, keyword research is the first step in the process of writing the app description. With a capacity of 4,000 characters, the Google Play long description can contain lots of keywords, so make sure you have a nice list of relevant terms before starting to write.
Learn more: HOW TO DO APP STORE KEYWORD RESEARCH FOR IOS AND ANDROID
Step 2: Create the App Description’s Structure
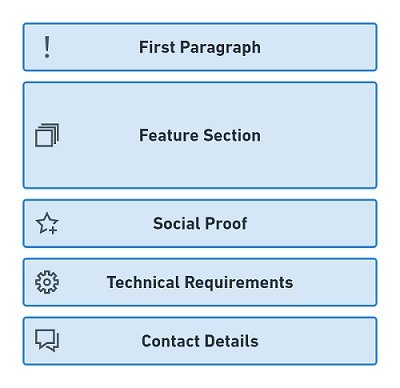
As said, you have up to 4,000 characters to write your app description. Before you start writing, you need to create a structure for it with different sections. And next, you must apportion a character target count to each section. Typically, your app description includes five different parts:
- The First Paragraph (ca. 200-300 characters)
- The Feature Section (ca. 1,500-2,500 characters)
- The Social Proof Section (ca. 300-500 characters)
- The Technical Requirements Section (ca. 200-400 characters)
- The Contact Details Section (ca. 100-300 characters)
The character counts are only approximated values. Depending on your app, it might make sense to alter the length of a single section. For instance, if your app is new and you do not have much social proof to share, you can make the social proof section shorter or leave it out completely.
Step 3: Write the First Paragraph OF YOUR APP DESCRIPTION
Now, write the first paragraph. This is the most important part of your app description because after reading it, the user will decide whether to read on or not. Thus, you must make it interesting and engaging, so it hooks the reader.
Use the first paragraph as a summary that tells readers the most important facts about your app in short. State its unique selling points (USPs) right away, for instance:
- Name the most important features.
- State what makes your app special in comparison to your competitors.
- Let users know about your app’s benefits in terms of convenience, content variety, user support, or price.
- Add one impressive piece of social proof.
The first paragraph should not be longer than three or four sentences with 200 to 300 characters in total.
Step 4: Write the Feature Section
The feature section is the biggest part of your app’s long description on Google Play. Its purpose is to substantiate the summary that you give in the first paragraph. Explain your app’s functions in detail and tell readers how they solve their problems. Make clear how your app makes users’ lives better.
Remember, that the long description is indexed. So make sure you place many relevant keywords in this part of your text. Use each term up to five times in your description to create the maximum impact on search results.
To make your feature section a comprehensible and interesting read, embed it into a storyline. By connecting your arguments in a logical order, you can guide readers through your text and decrease the chance that they get confused and leave.
For most apps, one of the following three storylines is a good match.
Transactional Story
A transactional story is appropriate for any app that has a short, linear user journey and delivers a concrete result at the end of every journey.
Here is how you could order the features of a travel app to create a transactional story:
The search process: Tell users which destinations and hotels your app covers, and which filters they can use to specify their search (price range, hotel quality, etc.).
- The SERP: Point out the clear arrangement and user-friendliness of search results and how users can order or filter them further.
- The details pages: Emphasize the variety of details, pictures, and reviews, your app presents for every destination.
- The favorites list: Explain to users how to save hotels and compare them against each other.
- The booking process: Clarify the simplicity of the booking process, including the price transparency, the various payment methods, and the confirmation.
You can tell similar transactional stories about many types of apps, such as:
- Transportation apps (flights, train rides, taxi & driver services).
- Navigation apps (for traveling but also for running, biking, etc.).
- All kinds of shopping and marketplace apps (physical and digital goods).
Games with linear user journeys like puzzles, adventures, or graphic novels.
Excerpt from the App Description of Uber with a transactional storyline
Progression Story
Many apps have linear user journeys, but they do not provide immediate benefits after every usage. Only using them regularly will result in some kind of improvement for users. To emphasize these long-term results, tell a progression story.
This type of story is a great match for fitness apps: Using them to perform an exercise once will not result in any kind of improvement. But if people use it over and over again, they will look and feel better.
A progression story for a fitness app could look like this:
- The Exercise Selection: Show the variety of different exercises and which parts of the body they address.
- The Instructions: Line out how easy to understand the tutorial for the exercises are. Mention the graphics and videos that visualize the workout.
- The Workout: Tell users how the app helps them to perform their workout correctly. Does it have any audio support like spoken tips, a timer, or other useful features to help users doing their exercises correctly? Name them!
- Repetition: Introduce features that help users create routines to get fitter and stronger constantly. Point users to the intermediate and pro exercises, and challenge them to master them.
- Results: Mention how the long-term use of your app will create results. Before-and-after stories are very powerful, so tell success stories of real users who got fit with your app.
Progression stories also work for:
- Educational apps (languages, maths, programming).
- Hobby-related apps (instruments, arts, gardening, etc.).
- Games without a definite end (hypercasual, MMOs).
Complexity Story
Finally, some apps provide a lot of features and functions, but people do not use them in a predefined linear way. And depending on the way they choose, they might have different experiences and also different results. So transaction or progression stories do not make much sense for these apps.
Instead, you can present a variety of functions based on their complexity, starting with the most basic and ending with the most sophisticated functions. This is called a complexity story.
A complexity story makes sense for a calculator app:
- Basic functions: Start by introducing the basic arithmetic operations like addition and multiplication.
- Intermediate functions: Explain how to use the app to calculate percentages and fractions.
- Expert functions: Mention complex operations like calculus and vector analysis.
- Convenience features: In addition, you can tell users about functions that are not directly connected to the app’s purpose but make using the app easier. These convenience features might include a night mode, adjustable button sizes, or the option to save calculations respectively results.
Complexity stories are a good fit for all apps that do not have linear user journeys:
- Utility apps like calculators, translators, or scanner apps.
- Productivity apps, for instance, calendars, task managers, or budget planners.
- Communication apps, such as messengers, video and voice chat apps, or social networking apps.
- News apps, including weather, financial news, and sports results.
- Streaming apps for videos, music, and radio programs.
- Designing apps for photos, videos, or music.
Step 5: Add Social Proof To YOUR LONG DESCRIPTION
After listing your features and explaining your app’s benefits, you should underline its quality by providing more social proof. Let users know that your app is successful, your existing users like it, and reviewers praise it.
Here are some forms of social proof that are good fits for your app description:
- State the number of active users (given it is impressive).
- Mention the number of problems that your app has solved, like the number of matches in a dating app, booked hotel rooms in a travel app, or levels played in a game.
- Cite press coverage about your app.
- Name rewards your app has won.
- Mention app store features and great top charts rankings.
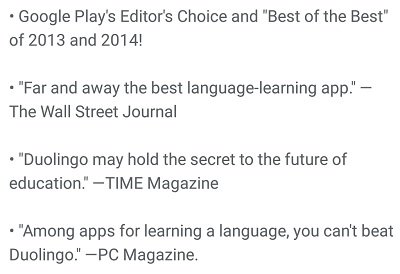
Excerpt from the App Description of Duolingo with Social Proof
Step 6: Add Technical Requirements
It is a terrible experience for users if they download an app and it does not work as expected on their device. To avoid disappointments like that, state the technical requirements of your app. Here are some examples of technical facts to include in your description:
- If the app works on or is optimized for specific device types, name them (or name the device types it does not work on).
- Tell users which permissions the app needs to function properly like access to location services, the users’ contacts, or the camera.
- Make clear if the app needs an active internet connection to run properly or works in flight mode as well.
- In case some of your app’s features or content are only available after users paid for it, it makes sense to reveal this information for reasons of transparency. However, this only goes for highly valuable non-consumable IAPs or subscriptions. You should not mention consumables like in-app currency. Especially users of gaming apps might consider these IAPs “pay to win” and be put off by them.
- Optionally, you can state the languages that are available in the app, so users know whether their native language is supported or not. This is in particular important if the in-app languages are not the same as the app store localizations.
Learn more: MULTILINGUAL ASO – 10 TIPS FOR APP STORE LOCALIZATION
Keep the paragraph about technical requirements short and simple.
Step 7: Add Contact Details
The last part of your long description is the contact section. Give users the chance to get in touch with you to ask questions, solve problems, or make suggestions to improve your app. Let them know:
- your website,
- the email address of your support team,
- the support hotline (if you have one),
- your social media accounts.
You can implement hyperlinks into your app description, so simply link users to your channels. A simple list is fine for this purpose.
In addition, you can also tell readers about your app portfolio. If they like your app, it is possible that they will download your other apps, too.
Step 8: Beautify Your App Description
If you are satisfied with the content of your app description, it is time to beautify it. Facing a wall of plain text will put many readers off. With a proper structure and visual highlights, you can make it a more interesting read and also lead readers’ attention to important parts of your description.
First, make sure to portion your description into short paragraphs of two to four sentences. Split the feature section up and create one paragraph per feature. Add line breaks and blank lines to separate them (see below how to do it). Create headlines for each paragraph to give users an idea of what it is about. To set them apart from the rest of the text, use all-capitals.
Next, set visual highlights. You can do so by using HTML tags to format single words or phrases. Each HTML tag has two parts: The first one tells Google where the new text style starts, and the second one where it ends. Here is an example:
This section is <b>very important</b> for your app description.
On your Google Play product page, the words “very important” will appear as bold text, because they stand between the opening and the closing tag:
This section is very important for your app description.
Similarly, you can make parts of your text italic as well as underline or color them. You can also create headlines with a bigger font-size. The following list shows you all the HTML tags that Google Play supports:
| Style | Opening Tag | Closing Tag | Example Code | Result |
|---|---|---|---|---|
| Bold | <b> | </b> | This is <b>bold</b> text. | This is bold text. |
| Italic | <i> | </i> | This is <i>italic</i> text. | This is italic text. |
| Underline | <u> | </i> | This is an <u>underlined</u> word. | This is an underlined word. |
| Colored | <font color=color name> | </font> | This is a <font color=red>red</font> word. | This is a red word. |
| Line Break | <br> | This is line 1.<br> This is line 2. | This is line 1. This is line 2. |
|
| Headline | <h3> | </h3> | <h3>This is a headline</h3> | This is a headline |
The headline style also work with <h1> or <h2> tags that create bigger headlines than the <h3> tags.
Do not use too many highlights in your description. Use them rarely to draw readers’ attention to important keywords or phrases like the introduction of your apps’ USPs.
In addition to HTML styles, you can also use emojis in your long description. However, you should do so only for apps of certain categories, such as games and leisure apps. For apps that are used in a professional context, emojis are not appropriate in most cases.

Excerpt from the App Description of Home Street with Emojis
Be aware that HTML tags, as well as emojis, are counted against the limit of 4,000 characters.
Step 9: Proofread Your App Description
The last step for creating your long description is proofreading. Make sure that it has a proper structure and that the storyline of your feature section is reasonable. Double-check for typos, and grammatical errors. Also, try to make reading your description easier by replacing complicated terms and shorten sentences.
Check out these tools that will help you to make your app description a better read:
Grammarly
Grammarly is a great tool that helps you locate misspelled words, missing interpunctuation, and other errors in your texts. I use it for all of my texts, including my blog posts and my book.
The great thing about Grammarly is that it does not only point you to an error and suggests a correction, it also explains why the term in question is wrong, so you can avoid similar errors in the future.
The basic version of Grammarly is completely free. But with the premium version, you can use additional helpful features such as:
- A Readability Checker that points you to phrases that are hard to read.
- Vocabulary Enhancement Suggestions to improve your writing.
- A Genre-specific Writing Style Checker that helps you tailor your texts specifically for your audience.
- A Plagiarism Detector that checks your texts against many online sources to make sure you do not commit plagiarism.
You can use Grammarly online, as a desktop app, and as a plug-in for Microsoft Office products or Google Chrome.
Be aware that Grammarly only works for English texts, but not for other languages.
Hemingway Editor
Another useful tool to improve your app description is the Hemingway Editor. It helps you improve the readability of your text and make it more accessible by pointing you to bulky vocabulary over-complicated sentences.
The free version of Hemingway is available online, but you can also buy the desktop version for Windows or Mac OS.
Test the Hemingway Editor now.
Online HTML Editor
If you use HTML tags in your description, you should check the formatted result before you upload it to Google Play. With the Online HTML Editor, you can see how your app description will look like, and you can find errors such as missing closing tags immediately. The Online HTML Editor is free of charge.
Test the Online HTML Editor now.
Conclusion
Your app description is an important part of your app’s product page because it contains more useful information than any other metadata element. And with the tips in this post, you can make it an informative and interesting read for potential users.
However, you should always match your long description with the rest of your metadata, so you create a congruent product page. For instance, make sure that the story you tell can be visualized in your screenshot set or video.
In any case, review and adjust your app description on a regular basis, so it is always up to date.

DO YOU WANT TO LEARN MORE ABOUT ASO?
Then you should check out the App Store Optimization Book.
On more than 300 pages, you will learn everything you know about ASO, including keyword research and implementation, writing app descriptions, designing screenshots and app icons, composing app preview videos, and localizing your product page.
The ASO book offers easy to understand step-by-step guides and more than 140 helpful figures and example graphics.
